

Post by Bullshop on Mar 21, 2017 8:49:13 GMT -7
I had struggled with boxing bullets for storage and for shipment for a very long time. For a number of years I used the plain white boxes from Midway and also a similar plain brown box from another source. These were fairly handy but never really a good fit for a shipment of 100 bullets in varying calibers, and lengths. Finally about three years ago I found a source for free boxes and each box is a perfect custom fit for 100 bullets in its intended caliber and length of bullet.
I keep quite a large number of auctions going at Gun broker each auction having a picture of an open box of 100 bullets and each box a perfect fit for the number and size of bullets. I have found that these auctions at GB are the cheapest form of advertising I have been able come up with. Many people see these pictures and inquire about my source of bullet boxes so I thought perhaps some folks here may appreciate learning of my source for free bullet boxes.
I had hoped that Jr. would help me do a short video but he is off again on a new adventure so a video is out but we will try to aid my poor descriptions with pictures. First a picture of the tools and materials needed to MAKE FREE BOXES.
Scissors
exacto knife
measuring ruler
straight edge ruler
standard scotch tape and dispenser
wide packaging tape
box making material
pen/pencil

OK I think thats it. On the measuring ruler you want at least 1/16th " measurements. This is close enough to get a good fit for caliber. A one sixteenth inch segment equals about .06" so when calculating box dimensions per bullet diameter you can get close enough for a good fit. Sometimes I even split the 1/16ths depending on actual bullet diameter. Figuring box dimensions for a 100 round box is simply bullet diameter X 10. For the box side height I use a bullet that the box is intended for to measure the sides.
The straight edge is for making long lines with pen/pencil
The exacto knife is for scoring lines so the box material will fold easily at the dimensions needed.
Standard scotch tape & dispenser for taping corners. The dispenser is sooooo important for making this easy.
Box making material is any laminated non corrugated type of box like cereal box or frozen pizza box. You want flat laminated (non corrugated) box material with glossy exterior.
Now before we move on with further descriptions and pictures I should mention that I may be making this sound not worth the trouble but actual time investment per box once you have tools and materials out and you have the hang of it is about ten minutes. I do this several time a day nearly every day so it seems quite simple for me.
more to follow shortly!
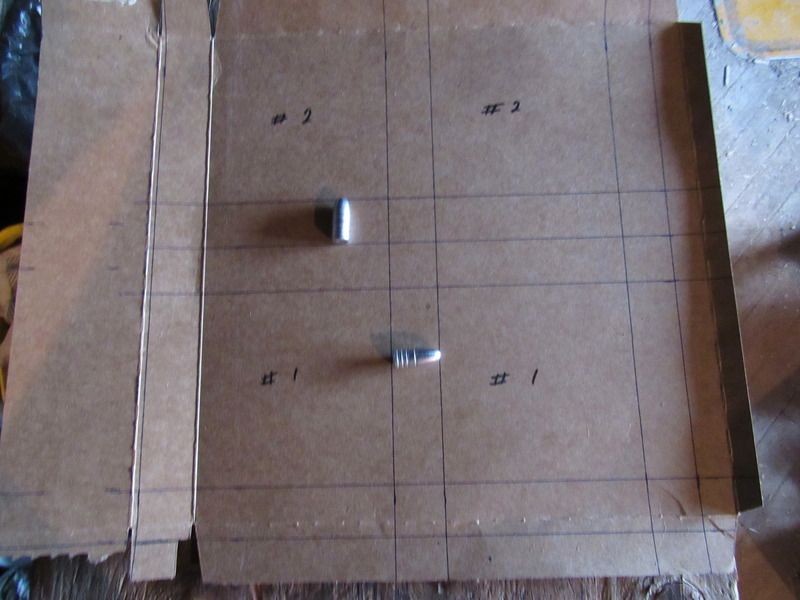
This picture shows the layout and that I am utilizing the whole material box to make two bullet boxes. This saves on material and saves time because your measuring once for two boxes and just extending your lines farther. When making more than one box this way remember to make a double tab on one side of your boxes as seen between box #1 and box #2. This way when you sepperate the boxes you still have a tab for each box.

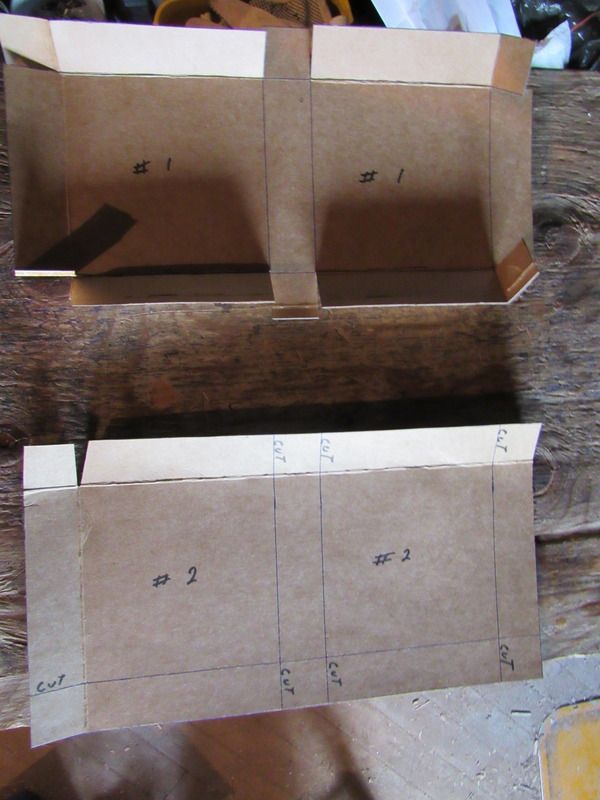
This picture shows the two boxes with excess paper trimmed off and ready to split into two separate boxes. After splitting score the lines with the exacto knife. Remember your not trying to cut through just score a line so the material will fold evenly and easily. Here is a tip for scoring, do not focus on the tip of the knife but focus about 2" past the tip and use peripheral vision to stay on the lines. This makes it much easier to make a smooth continuous score .
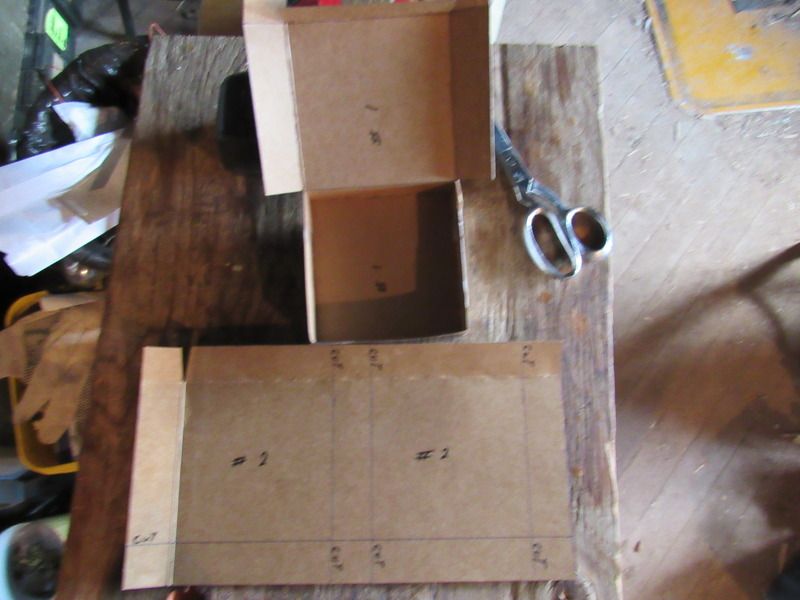
Next step is to cut the tabs. You want to end up with a tab at each corner and each side of the middle. These make the boxes stronger when taped together.
Another good tip is to fold each score line backward first then forward to the taping position. This makes them easier to handle while taping the corners and makes smoother sharper edges without bulges. As you can see I start my box measuring by using one of the original folds from the material box.
Now with the tabs cut fold the score lines together to form your box. I always put the tabs to the inside of the box for taping. At that point your tape dispenser is so helpful in cutting the short strips of tape used to tape the corners both inside and outside. I put a strip of tape on the outside corners and on the inside tabs.

That's it you done. That took a lot more effort to explain than it does to make a box.

Now with the box filled with the bullets it was made for I close the lid and tape the sides using the tape dispenser to hold the box closed for easier handling while I give to box full coverage in both directions with the wide packaging tape. First tape one direction then give the box a quarter turn and tape again. I go completely around the box in both directions with the wide tape. Your finished box of bullets will now tolerate some fairly rough handling for sure because these go through our postal system with a very near 100% survival rate.
When you want to open one just cut the tape at the bottom edge of the closed lid and the box will open and can be taped closed again if need be.
I hope this was more informative than it was confusing.
I keep quite a large number of auctions going at Gun broker each auction having a picture of an open box of 100 bullets and each box a perfect fit for the number and size of bullets. I have found that these auctions at GB are the cheapest form of advertising I have been able come up with. Many people see these pictures and inquire about my source of bullet boxes so I thought perhaps some folks here may appreciate learning of my source for free bullet boxes.
I had hoped that Jr. would help me do a short video but he is off again on a new adventure so a video is out but we will try to aid my poor descriptions with pictures. First a picture of the tools and materials needed to MAKE FREE BOXES.
Scissors
exacto knife
measuring ruler
straight edge ruler
standard scotch tape and dispenser
wide packaging tape
box making material
pen/pencil

OK I think thats it. On the measuring ruler you want at least 1/16th " measurements. This is close enough to get a good fit for caliber. A one sixteenth inch segment equals about .06" so when calculating box dimensions per bullet diameter you can get close enough for a good fit. Sometimes I even split the 1/16ths depending on actual bullet diameter. Figuring box dimensions for a 100 round box is simply bullet diameter X 10. For the box side height I use a bullet that the box is intended for to measure the sides.
The straight edge is for making long lines with pen/pencil
The exacto knife is for scoring lines so the box material will fold easily at the dimensions needed.
Standard scotch tape & dispenser for taping corners. The dispenser is sooooo important for making this easy.
Box making material is any laminated non corrugated type of box like cereal box or frozen pizza box. You want flat laminated (non corrugated) box material with glossy exterior.
Now before we move on with further descriptions and pictures I should mention that I may be making this sound not worth the trouble but actual time investment per box once you have tools and materials out and you have the hang of it is about ten minutes. I do this several time a day nearly every day so it seems quite simple for me.
more to follow shortly!

This picture shows the layout and that I am utilizing the whole material box to make two bullet boxes. This saves on material and saves time because your measuring once for two boxes and just extending your lines farther. When making more than one box this way remember to make a double tab on one side of your boxes as seen between box #1 and box #2. This way when you sepperate the boxes you still have a tab for each box.

This picture shows the two boxes with excess paper trimmed off and ready to split into two separate boxes. After splitting score the lines with the exacto knife. Remember your not trying to cut through just score a line so the material will fold evenly and easily. Here is a tip for scoring, do not focus on the tip of the knife but focus about 2" past the tip and use peripheral vision to stay on the lines. This makes it much easier to make a smooth continuous score .

Next step is to cut the tabs. You want to end up with a tab at each corner and each side of the middle. These make the boxes stronger when taped together.
Another good tip is to fold each score line backward first then forward to the taping position. This makes them easier to handle while taping the corners and makes smoother sharper edges without bulges. As you can see I start my box measuring by using one of the original folds from the material box.

Now with the tabs cut fold the score lines together to form your box. I always put the tabs to the inside of the box for taping. At that point your tape dispenser is so helpful in cutting the short strips of tape used to tape the corners both inside and outside. I put a strip of tape on the outside corners and on the inside tabs.

That's it you done. That took a lot more effort to explain than it does to make a box.

Now with the box filled with the bullets it was made for I close the lid and tape the sides using the tape dispenser to hold the box closed for easier handling while I give to box full coverage in both directions with the wide packaging tape. First tape one direction then give the box a quarter turn and tape again. I go completely around the box in both directions with the wide tape. Your finished box of bullets will now tolerate some fairly rough handling for sure because these go through our postal system with a very near 100% survival rate.
When you want to open one just cut the tape at the bottom edge of the closed lid and the box will open and can be taped closed again if need be.
I hope this was more informative than it was confusing.
